Tuesday, September 16, 2008

Pumpkin Muffins

This is a good fall recipe, as long as you like pumpkin. I believe my sister makes the same recipe as cookies instead of muffins.

All you need is 2 ingredients:

1 spice cake mix
1 can pumpkin

You mix the two together. It makes 12 muffins. Bake at 350 degrees for 10 minutes or until toothpick inserted in center comes out clean.

I have also included these ingredients in my short-term food supply because it's a great food storage recipe.

Sunday, September 14, 2008

Perfect Pancakes

Pancakes are usually our Saturday-morning tradition. One morning, I had a little fun with them and made them into pig shapes:

My mother insists the best pancakes are made from Bisquick. Sometimes they are a little too thick for me, but you can always add a little more milk. For the basic recipe, you mix together:

2 cups Bisquick

1 cup milk

2 eggs

You all probably know the rest: pour onto hot skillet, and flip when you start to see bubbles on top.

I did try making Martha Stewart's Perfect Pancakes one time for an Enrichment Night I was in charge of, but they ended up being more like crepes! So, I've had the most success with the above recipe.


Wednesday, September 3, 2008

Chocolate Chip Cookies-Small Recipe


This is actually a different recipe than I normally use; I usually use the recipe off the back of the Nestle chocolate chip bag (which I can post later). I tried this recipe because it was in a recent magazine and had the title "the perfect cookies." The taste was similar, but what I really liked about it was that the recipe made only 20 cookies. So this is a great recipe to use if you don't want to have a lot of leftover cookies. Sometimes I freeze the extras or share them with others, but you don't have to worry about it if you use this recipe.

1 ¼ cups flour
½ tsp. baking soda
½ tsp. salt
½ cup butter or margarine, softened
½ cup packed brown sugar
¼ cup sugar
1 large egg
1 tsp. vanilla
1 cup semisweet chocolate chips

Preheat oven to 350 degrees. Combine flour, baking soda, and salt in small bowl and set aside.

In large bowl, beat butter and sugars on medium speed until creamy. Beat in egg and vanilla. Reduce speed to low; beat in flour mixture just until blended. Stir in chocolate chips.

Drop dough by heaping tablespoons, 2 inches apart, on ungreased cookie sheet. Bake 10 minutes or until golden around edges. Cool on wire rack.

See cookie tip here.

This is T after eating one of these cookies:


Sunday, August 31, 2008

Marlene's Never-Fail Bread

Okay, so this is the much-anticipated entry about my breadmaking experience. This is more a review of a recipe than an actual recipe. Someone at church said the best food storage cookbook is Marlene's Magic With Food Storage. I purchased the cookbook, and the picture above is the first recipe I tried. It is called "Marlene's Never-Fail Bread" on page 144.

She says you can also use this recipe to make cinnamon rolls, donuts, hotdog and hamburger buns, and dinner rolls. It uses such ingredients as yeast, potato flakes, and powdered milk, all of which are ingredients you would have if you were living off your year's supply of food.

The recipe makes seven loaves of bread. Since I had only three bread pans, I made three loaves of bread, one round loaf, one pan of rolls, hotdog buns, and hamburger buns.

To jump to the conclusion, I was not all that impressed. This is why:

1. The recipe made such a huge amount of dough that it wouldn't fit in one huge bowl.

2. The recipe called for kneading the dough 10 minutes. Since I had to split the dough into 2 huge amounts, I actually had to knead for 20 minutes.

3. The recipe called for 16 cups of flour, but I ended up using closer to 20 cups--which seemed like half of my bucket of flour!

4. The bread had a bland taste, which is perfect for sandwiches and buns (you don't want to overpower the toppings). It is definitely not the kind of bread you would want to eat by itself fresh out of the oven--not without a lot of butter and jam, anyway.

5. The bread had a crumbly texture.

So, I 've still got a ton of bread in my freezer that I need to find some use for...

Does anyone else have this recipe book, and, if so, have you had any luck with the recipes?

Saturday, August 30, 2008

Banana Boats


I think this is a snack my mother created. I made it just the other day as an after-school treat. We used soy butter instead of peanut butter because of A's allergy. The kids loved it!

To make the banana boat, I cut a banana in half (but I usually use a whole one) and scooped out some of the middle. I filled it with peanut (soy) butter. I actually put some in a baggy and cut off one of the corners and squirted it into the banana that way. I put chocolate chips on top of the peanut butter. The kids loved it!

Any other good ideas for after-school snacks? Post a comment if you have one!

Friday, August 15, 2008

Cake Mix Brownies...Don't Do It!

I tried this wonderfully easy recipe last night that I had clipped out of the newspaper. It was a recipe for brownies made out of a cake mix and had three ingredients...but they were AWFUL.

The batter tasted like cake, not brownies. The final product tasted like cake, not brownies. But it was also dry, crumbly, and grainy. So I frosted it, but it didn't help. It ended up in the trash can, much to the shock of my children.

So, next time I will stick to another recipe I know is good...Cake Mix Cookies.

Wednesday, August 13, 2008

Bean and Cheese Burritos

This is a recipe from my childhood. My mother used to fry these burritos, and we would dip them in a mixture of ketchup and Texas Pete hot sauce. I've started making them again because it is a very budget-friendly meal.

I can make about 8 burritos with one small can of fat-free refried beans and 1 to 1 1/2 cups of shredded cheese. Instead of frying them, I spray both sides of the burrito with nonstick cooking spray and cook them on a skillet until they are golden brown on each side (see the picture). The kids are crazy about them, and our family of 5 eats all 8 burritos in one meal!

Friday, August 8, 2008

Homemade Pretzels

This was a fun afternoon activity. It involved only 2 timeouts and 10 handwashings! This is an easy pretzel recipe because you don't have to wait for the dough to rise before you bake them.

Mmmmmm!!!


1 envelope (1/4 ounce) active dry yeast
1 1/2 cups warm water
2 teaspoons salt
1/4 cup honey
5 tablespoons sugar, divided
4 1/4 cups flour
4 tablespoons butter, melted
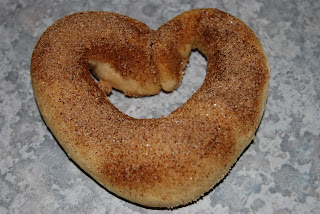
1 tablespoon cinnamon

Heat the oven to 425 degrees. Line 2 baking sheets with foil.

In a large mixing bowl, dissolve the yeast and warm water. Add the salt, honey, and 1 tablespoon sugar and stir well. With an electric mixer, blend in the flour at low then medium speed.

Turn the dough out onto a lightly floured surface and knead until it's smooth (about 5 minutes). Divide dough into 16 equal pieces and roll into a 10 to 12-inch-long rope. On the foil, shape each rope into a letter, number, or other design.

Bake the dough for 15-20 minutes or until lightly browned. In small bowl, combine cinnamon and remaining 4 tablespoons sugar. Brush pretzels with melted butter and sprinkle cinnamon sugar on top. Makes 16 pretzels.
Posted by Picasa

Wednesday, August 6, 2008

Ice Cream in a Baggie

This is a recipe we had to try out at home because we are making it at a Primary activity on Saturday, and we had to make sure it worked. It did work, and we had a lot of fun doing it! After 5 minutes, the ice cream was a milkshake consistency and very yummy.

1/2 cup milk or half & half (we used whole milk because that's what we had on hand)
1 tablespoon sugar
1/3 teaspoon vanilla
squirt of chocolate syrup or other optional add-ins like mini chocolate chips

Place ingredients in sandwich-sized baggie and seal. Place in quart-sized baggie that has been filled halfway with ice and 3 tablespoons of rock salt. Seal.

Shake and dance around for 5 minutes or until the ice cream reaches the consistency you would like. We ate the ice cream right out of the baggie after wiping the salt off the outside with cool water.

Fish Sandwiches

I came up with this dish by using a technique I saw on the Food Network Channel (and tweaked some myself). Our family is tired of eating salmon, so we've switched to tilapia. The technique could be used with any kind of fish. The whole family loved this recipe.


4-4 oz. tilapia filets (we buy the 1 pound bag in the freezer section at Wal-Mart for around $3.50-there are 4 individually vacuum-packed tilapia filets in them)
flour in dipping bowl
1-2 eggs, cracked and whisked in dipping bowl
Italian-style breadcrumbs in dipping bowl
rolls (we prefer Sister Schubert's yeast rolls you can buy in the freezer section at Sam's Club)
tartar sauce

Thaw the filets per package directions. Dredge them in flour. Dip them in egg mixture and then coat in breadcrumbs. Place them on a baking sheet that has been sprayed with nonstick spray. Spray the tops of the filets to get the fried effect. Bake them at 350 degrees for 15-20 minutes (I think) and place them on rolls with tartar sauce. Yum-o! Everyone loved the recipe.